Showing posts with label homemaking. Show all posts

Saturday, November 16, 2013

Our home ... reminising


I'll never forget the date of us moving into our first home. November 15th, 1996.  It's been our first and only house for 17 years now!  Doesn't time go so quickly?

When we went looking for this home, the goal was to find somewhere with a really good sized backyard and a lovely atmosphere; somewhere we'd be happy to stay and raise our family for a number of years.  This anniversary is a really good time to stop and be thankful that we've found that here.  For the most part, we've had lovely neighbours, some of whom have moved and most who are still here. I think I got to know most of them really well when I used to spend hours gardening out the front and people would stop by for a chat.

The house itself has gone through it's progressive stages of change. We bought it knowing that it required improvements. Each year was a new goal to fix up something. New fences, a proper driveway, guttering redone, the pergola completely remade, repainted throughout, bathroom renovated, outside sunblinds put up, floorboards polished, a new bedroom created by dividing the rumpus room ....  A house really can go through quite a change when there's a family growing up within it's walls over many years!!


A lovely reminder of our establishment here are our fruit trees.  They were planted as soon as we could get them in, except for the apricot tree which went in on Maestro's first birthday.  They've been bearing delicious fruit for us each Summer for many years now.  I couldn't imagine not having them here now!

There is still a list of things we'd like to do here, and we'll continue to plod along doing one thing at a time as we're able.  But I'm thankful that we've had our place, here, for so long and through all our family adventures.  Who knows what could happen further along the road. :)

Friday, April 5, 2013

April 5th Wrap Up - visiting and chores

Hello!  I hope you've all had a good week, especially with a long weekend added in.

We've enjoyed being away to visit at my Mother-in-law's, down at Loch Sport in Victoria's Lakes district.  The weather was perfect, although a bit too windy to get out in a boat.  Best of all, we didn't have any mozzies to battle every evening!  Oh, yes, we did have a bit of a drizzly afternoon on Tuesday, but that was remedied with a movie afternoon.


I'd love to share some photos with you all, but alas my camera has gone kaput!  A topple off the bench and now the shutter doesn't automate properly, resulting in overexposed pictures.  So, as soon as I get a new one, we're without photos, I'm sorry.  :(


We got home from Loch Sport on Wednesday afternoon, so Papa (my husband) enjoyed a VERY short week back to work.

The children and I have been focussing on home duties.  They're very keen to earn as much pocket money as possible, so we're assisting them by posting up jobs to be done around the home.  I write up a post-it note with the required task, breaking the job down into steps to make sure all aspects are understood, and a price we're willing to pay for it's completion.  The children negotiate who wants to do what (needing to share big ticket jobs, like washing the car, equally).  Upon completion, I check the job has been done satisfactorily and then pop the post-it note into my diary, signing it when payment has been made.

The whole idea of posting up jobs for the children to choose from originated in a book I've been reading called Cleaning House by Kay Wills Wyma. She tells of how she expects her children to apply their life skills and actively be part of the working family (or as she puts it, getting rid of 'Youth Entitlement').  Every chapter is a new step she works to employ each month, telling how each child takes to the suggestions and what she learns along the way.  I really am enjoying reading this, with her good sense of humour (and who doesn't need a good sense of humour when parenting?!)  I'd recently read the chapter on paying for work around the home, and decided we'd start doing this with our children.

So far I'm very happy with the system.  Mariposa decided to take on the car washing and helped do some light pruning along the driveway.  Maestro moved a huge pile of bricks, cut back a shrub we're going to be removing, then swept up any remaining debris.


And speaking of jobs done outside .... we finished putting up a greenhouse the previous week!  I'd bought it a while back with our tax return money, but it was a huge task to put this kit together alone.  I needed Papa's muscle power.  But it's up and only needs the staging shelves made up so I can start my next lot of seedlings.

I'm making up lists of outside jobs I need to complete and get my autumn sowings underway.  We really need to get more salad greens going as the last lot I put into pots are almost exhausted.


I know this post isn't much fun without many pictures.  I'll remedy that as soon as the camera upgrade has happened.  :)

Until next time!
Catherine


Read what other homeschoolers have been up to at this week's linkup HERE.

Friday, December 7, 2012

Cherry season!

It's early Summer and it's CHERRY SEASON!  Yum!  This is our first fruit crop of the season.  Our Stella Cherry tree produced a 'stella' crop.  Look at this huge bowlful, and that's only about 1/4 of what we picked.


Unfortunately, not all the fruit ripened fully on the tree.  We had to pick it early as the birds were having a huge feast.  I don't mind them having some, but it was disappearing very quickly.  Picking the fruit early means that they don't develop their natural sweetness to the maximum, because cherries won't continue to ripen after being picked, unlike other stone fruits. (I learnt that from the River Cottage dvds).

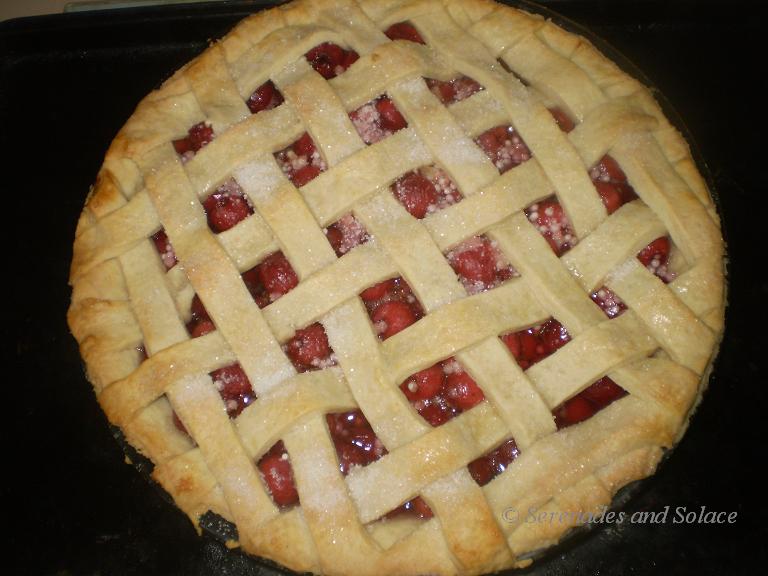
Last night we decided to have a go at making a cherry pie.  It gave me a chance to try out this little gadget: a cherry stoner.


My hands were very sticky and very well stained after we finished doing four cups worth!

We followed a recipe I found at Joy of Baking.  It uses tapioca as a thickening agent, which I had on hand, so thought we'd try out.


After the required baking time, I found I needed to let the pie 'sit' a little while to cool and let the tapioca soak up all the lovely cherry juice.  Maybe it's because my tapioca wasn't the 'quick cooking' variety specified.  Anyway, it tasted WONDERFUL!


Until next post!

Catherine

Sunday, November 25, 2012

Yummy garlicy potato wedges

These are just SOOOoooo yummy, and so easy to make.  
Mariposa quickly put this together for us for lunch this weekend.


Prepare a large baking tray by lining with baking paper.
Set oven to 200degC.

Allow two medium sized potatoes per person.
Cut into wedges and pop into a bowl.


Sprinkle over a tablespoon of plain flour 
and 1/2 a teaspoon of garlic powder*.
Toss to coat wedges well.

(*Add a teaspoon of minced garlic if you don't have 
garlic powder, as we did this time.)


Place wedges onto a baking tray, in a single layer.
Drizzle over some olive oil.

Bake for 30 mins.
Turn pieces over for even browning and cook another 30 mins.

Eat whilst hot, sprinkled with some salt, 
and a dollop of sour cream and sweet chilli sauce if so inclined.

Enjoy!!


Friday, September 28, 2012

Salmon Quiche

Another dish has made it to the 'Our Favourites' list.  I made a salmon quiche for lunch last weekend.  It's been a nice way to get through some of the eggs.  Already Maestro is asking when we can have it again, so I decided to cook it up for lunch tomorrow.  Once fully cooked, it can be reheated and served with a salad and some crusty bread.


Salmon Quiche

Pastry:
1 1/4 cups plain flour
90g chopped butter
2-3 tablespoons iced water

1.  Brush a pie dish, or flan tin, with melted butter or oil.

Sift flour into a large bowl; add in chopped butter. Using fingertips, rub butter into flour until crumbly.
(Alternatively, put into food processor and pulse until it resembles breadcrumbs).

Add some of the water and work until the dough begins to come together.  Add more water if needed.
Turn onto floured board and work into a ball so all comes together.  Roll out pastry so it's large enough to cover base and sides of tin.  Fit into dish/tin and then refrigerate for 20mins (minimum).

2. Preheat oven to 180degC.

Cover the pastry with baking paper and a layer of dried beans or rice.  Bake for 10 minutes, remove from oven and discard paper and beans/rice.  Return pastry to oven and cook another 10 minutes until lightly golden.  Cool.

Filling:
420g tin salmon (red or pink)
1/2 cup soft cream cheese
1/3 cup ricotta cheese
3 eggs, lightly beaten
3 spring onions, finely chopped
1 tsp dill (optional)

3. Drain salmon well and break up in a large bowl.

Place cream cheese, ricotta and eggs into a food processor and pulse until mixture is smooth.

4. Stir egg mixture into salmon, adding spring onions and dill.

Pour into prepared pastry shell.  Bake 30-35 minutes until golden and set.


Hope you enjoy it! :)


Monday, July 9, 2012

Learning to keep the home fire burning

One week of term break is over, and now we're into our second.

I'm feeling so much more relaxed!  It's easy to forget how busy the day to day routine is until everything actually winds down.

Our start to winter has been very cold.  Frosty evenings has encouraged us to get the heater going by around 4pm so the house is comfortable before sundown.  Maestro's been given the job of learning to manage the fire as of last week, in our Coonara heater.  He's setting it all up himself now and getting the fire going.

There's a bit of an art to getting the fire going well, but he's managing fine.  The first thing he had to do, before getting any fire actually started, was to clear out the ash that was already there. It's amazing how much can accumulate after a week! The ash is great in our compost bin, especially with all the chook manure. (Ash is alkaline, whilst chook manure is very acidic.) We don't clear out ALL the ash, though.  We leave a small 'carpet' on the bottom as this actually heats up when the fire is going and keeps it burning hotter.

Now to make the fire!  We use old newspaper to start with.  Don't use glossy printed paper as it gives off toxic fumes.  We also avoid using any leaves as they give off an awful lot of smoke.

The newspaper is rolled length-wise and then 'tied' into a knot.  A small pile of around 6 pieces is usually enough. We then make a 'tent' around the paper using the tree prunings we have dried out from last year.  The prunings were all cut down into piles of small twigs to larger sticks whilst the wood was still green, then stored in bins for the next winter once they were dry.  The smallest pieces are laid around the paper, followed by thicker pieces, and any pinecones we may have collected whilst on a walk.

Once the match is struck and applied to the paper, it doesn't take long for it all to get started.  It has to be watched very carefully, slowly added thicker pieces of kindling until there are some nice red coals starting up.  It's then tempting to just put on a large piece of wood and hope it'll keep burning, but those pieces of wood still need to be placed carefully to keep the fire alive.  I've taught Maestro to put them across the coals at an angle, trying to keep the 'tent' shape as much as possible.  This keeps the heat in the centre still, and allows the air to still flow through so that you don't end up with a smouldering pile of timber.


Watch carefully to check that those larger pieces do catch fire.  When a blue flame is established and a nice glow is beginning to show, you can put in a final piece of wood (Carefully, though!  Don't crush that tent shape!) and close the door.  *Check that the damper is open, too.  You'll know if it's closed if the fire begins to dwindle away and smoke fills the heater.  Opening the damper allows the air to flow through properly.

Once the fire has been going for a while, you'll get plenty of red hot coals.  Gently and carefully spread them across the floor of the heater before adding any more wood. We usually top the heater up at least once more before letting it burn out for the night.  We don't dampen the fire down much, either.  This means that the fire burns hotter and quicker, but we also avoid a higher soot build-up in the chimney.

The type of wood you use will affect how hot and quickly it will burn.  Pine wood burns very fast.  We're currently using up some old hardwood fence posts from my Dad's place, from when they had to replace their side fence. These pieces haven't been treated at all, and they're extremely dense, so we're getting a good heat from them that lasts several hours!

It's a lovely warmth that fills the house when the wood heater is going.  Sometimes we can still feel a little warmth in that main room when we get up in the mornings, too.

Hoping you are all keeping nice and warm this winter!
* Check out some other ways to 'Make Your Home Sing Monday' at momstheword.

Thank you for dropping by!

Wednesday, June 27, 2012

Quince results

Well, I have some good news and some bad news.

The good news is that the quince has cooked up beautifully and tastes wonderful. ( ** I added the juice of 1 lemon after a taste test a couple of hours after cooking. It needed some sourness added as it was too sweet.) We tried it out after 8hrs of cooking in the crockpot and found it was a lovely ruby red, but more like jam than the thick texture to put into molds for 'cheese' (or quince paste, as it's sometimes called).  So, some of it was taken out and put into some jars before turning the crockpot back on the try and get a thicker consistency.

The bad news is that the remaining quince jam still didn't get thick enough.  In fact, I had to turn it off as I was getting very concerned that it would develop a burnt taste.  I've ended up with a thicker version of the jam with a stronger flavour, which is still edible; I just didn't get to the really thick stage.

Here you can clearly see the difference:

On the left, the thinner 'jam',
and the thicker result on the right 
... which the children have already been
enjoying with cheese & crackers!

Maybe next time I'll just try making this in a regular stove-top saucepan.  An open saucepan and a higher constant temperature may remove more of the moisture, giving me a thicker consistency.

*   *   *   *   *

Whilst I was experimenting with this interesting fruit, Mariposa was working on her science experiment.  She has been learning about the digestive system, using Sonlight Science 5.


Here Mariposa has been seeing the effect of detergent (the emulsifier) on oil and water.  It was set up to show how bile breaks up fat molecules as food passes into the small intestine.

Of course .. who can resist the urge to make bubbles afterwards!


Thank you for dropping by!

Monday, June 25, 2012

Quince cheese

I'm trying something new .. which always makes me a bit nervous! .. but I thought I'd share this as part of participating in a meme: "Making Your Home Sing: Monday" at momstheword.

Quince cheese is something my South American mother-in-law introduced me to some time back.  It's very popular with cheese and crackers.  So, when I was given some quinces from a friend, I decided to have a go at making this up.

They're tough pieces of fruit; a little furry on the outside, but more like very firm apples.  We tried a little sliver raw ... very tart!  I don't think one would like to eat these without some kind of sweetening.


I chopped them all up roughly and popped them into a saucepan with a little water.  Then they were cooked slowly to soften (about 30mins).

Once they were soft enough, I put them through the mouli.  I had 8 quince to begin with, so about 1kg of sugar was added and stirred until dissolved.

This is what I've ended up with.  It's now going into the crockpot to slowly cook for several hours.  Apparently it will turn a deep ruby red and thicken.


Well ... it's been cooking since this morning and it's smelling lovely!  I'll let you know if it was a success or not soon.

Do you have something to share that helping make your home sing?  Jump on over to momstheword and join in.  Her post up today is very worth reading, too!


Thank you for dropping by!

Tuesday, May 29, 2012

Homemade laundry liquid

Here's a little job I've been waiting to try once our supply of laundry detergent had run really low, and yesterday I did it!  I wrote out the laundry liquid recipe from Down to Earth, went out and purchased the ingredients, then got to work making our first lot of homemade laundry liquid.


It only took 1/2 an hour to make, tops, and was so very easy.  When mixing the ingredients on the stove, the Lux flakes floated on the top for a while.  When it was all finally getting hot enough, the soap dissolved and the liquid thickened and became opaque.

I did find that the soap mix stayed a little lumpy when it was then added to the cold water, but a good shake when it had been distributed into the bottles (recycled milk containers) helped.

We even did our first wash with it in the afternoon and everything came out lovely and clean.  A blood stain on Mariposa's blouse, after a fall, came out easily after a little prewash soak using this mixture.  A tablecloth with a little wine spillage also came out clean.  Everything smelled fresh, even though I didn't put any fragrance into the mix.

So, 10 litres of laundry detergent made for around $2 ... and I'm happy!
If we use 1/4 cup per wash (more for heavier soiling), which means approx. 160 washes until I'll need to make up some more.

Thank you for dropping by!


Monday, March 19, 2012

Afternoon tea on Sunday

I finished my first ever tea cozy!  It didn't take very long to make, and I've realised I could make several more as the amount of wool used was minimal.  What's more, it was fun!


I had found this book at the library, Tea Cozies 2 by the Guild of Master Craftsman.  There is quite a collection of fun little numbers there; some are simple, others very ornate.  I decided my first would be a simple looking one: Strawberries and Cream.

My well loved little teapot doesn't look too bad with it's new 'jumper'.


Now, having completed this new tea cozy, we have to put it to use.  So, I quickly whipped up a yummy banana cake for us all to enjoy for afternoon tea.  It's a new recipe, from the Country Women's Association's new cookbook: Classics.  This cake was so lovely and moist.  The cream cheese frosting topped it off beautifully.


I guess you could say that I've just given both the pattern and recipe a trial run.  I have a tea cozy made for a girlfriend I'm visiting today, and I'll whip up another banana cake to take with me.


Thank you for dropping by!

Saturday, September 10, 2011

Flower Arranging (1)

Quarantine isn't much fun, especially when you're not really feeling 'sick'.  Mariposa was desperate to do something with me, so I suggested that she make a table arrangement.  She's helped me make some nice little arrangements before, but this time I let her take the reins and I was going to sit on the side ready if she needed some help.  I would also snap away and take plenty of photos. (smiles!)


Now, I do have  .... somewhere! ....  a proper little collection of flower arranging materials.  When I find them, we can explore some other options.  For now, we're just going to use the following:
  • a small waterproof bowl
  • a pair of secateurs
  • a small block of oasis, cut to fit into the bowl, allowing 1cm sticking out above the rim
  • a collection of medium sized leaves for covering the base
  • a nice selection of blossoms from the garden
  • some 'filler' blossoms or folliage to go between the flowers in the arrangment
I'm going to share how I was taught to do flower arranging from when I was at youth summer camp, in my teen years.  I really enjoyed learning this skill, so it's stayed with me. :)


First thing to be done is to soak the piece of oasis.  Oasis (or florist's foam) may be found at $2 shops, florists, or ebay.  Make sure you have a piece that fits snuggly into the bowl, and that it also is raised above the rim by about 1cm, then pop it into a dish of water so it can absorb as much water as possible (give it at least 1/2 an hour).  Whilst that's happening, you can go about collecting and laying out your flowers and folliage.


Once the oasis is full of water, carefully put it into the bowl.  At this stage, you'd usually tape it down with waterproof florist's tape.  I couldn't find mine, so we're making do without.

Start by making a 'skirt' for the arrangement with some medium sized leaves.  I often use camellia leaves, but some other suggestions are bay leaves, small ferns, or as we've used, scented geranium leaves.  Cut the stalks at a bit of an angle so there's more surface area open to the moist oasis.  The point also helps when it comes to inserting it into the arrangement. 


Next, choose your main flowers and think about where they'll be placed.  Because this is a table arrangement, we need to ensure that the finished product will be enjoyable to view from all sides, so aim to keep symmetry.  Here, Mariposa has used some freesias that have just come into flower.  I instructed her to place them evenly around, starting by putting a smaller flower at the center (top) for height.  Then, she put in a flower facing out at all the corners.  Wherever she placed one on one side, she had to mirror on the other as much as possible.


It's worth noting that lighter colours do appear to come more to the foreground than darker flowers, so place these lighter ones where they'll give good balance.  You'll notice that your eye will get drawn to these first.


Some larger flowers will fill up an arrangement quite quickly.  With ours, though, the freesias are fairly small, so we have plenty of 'spaces' to fill.  We've cut some shrubbery from our fragrant pittosporum bush, then cut off small bunches to fill in close to the oasis.  You want to hide as much of the oasis as possible, creating a background between the main blooms.  You can use all sorts of filler to do this job.  Some suggestions are thryptomene or gypsophila, which are commonly used by florists here, or variegated leaves from various shrubbery.


More filler flowers were added in the form of yellow marguerite daisies.  These highlighted the yellow freesias beautifully.  Then, finally, a few lavender flowers for a touch of 'blue' and some extra dimension.

Make sure some water is added to the bowl every day, and if the weather is quite warm, a spraying over with some water in a small bottle is beneficial.


Not bad for her first 'almost' solo effort.  I think this may become a fun little activity she can do for the family dining table on a regular basis, using the blooms we'll have in the garden throughout Spring and Summer.  We'll practice some other florist skills as we move along.

I have found a 'how to' video online. This may also help give you some information on how to start.  There are many other helpful related links from the video page HERE.

Saturday, September 3, 2011

Treasured Moments (2)

Erin at Seven Little Australians and Counting is away at the moment, but I thought I'd still do my week's worth of treasured moments.

Do you find yourself falling into a pattern of daily grind, skipping the 'fun' activities because you don't have time or lack energy?

Do creative arts, nature walks, drama, read alouds or spontaneous acts seem only a distant dream in your life?

Yet these Treasured Moments shared with loved ones uplift us, nurture our soul, remind us of the beauty and joy in our lives.

We want Treasured Moments for ourselves, for our children, for our families but how can we make it happen?

... Commitment ... Encouragement ... Support ... Ideas ... Plans.

You are invited to join us at the end of every week and share your plans and ideas, your targets and goals and your stories ... your 'Treasured Moments'. In this way we may inspire one another, encourage ourselves and start achieving our dreams. Hosted by Erin at Seven Little Australians and Counting

My Treasured Moments this week are:  
 
1. Last weekend was my Dad's 70th 'surprise' birthday party.  Those of my family who could get together were there.  Dad seemed really happy to see us all in one place, and having lots of bouncy grandchildren to play with was a special bonus!  We bought him a musical birthday card, which could record a vocal message.  When he opened the card he heard us all yell out 'Happy Birthday Grandad!", then it played a lively country jig .... which I said he could dance to in celebration of his retirement.


2. We're planning some bedroom renovations with the children.  Each child has an idea of some things they'd like to change, and now that they are a little older, we're giving them some more ownership and responsibility.  It's been lovely watching them get excited about what they could do and sharing ideas together. 


3. This was Mariposa's 'week off' from bookwork.  That means she gets to do lots of 'unschooling' activities. One of her priorities was sorting through her books and toys.  We also took time to go op-shopping together and she found some lovely summer tops and skirts.  She had fun trying to find some outfits for me also.

4. Maestro had more time to do his bookwork with me, due to Mariposa's week off, and we have especially enjoyed reading his Sonlight history book "Caesar Augustus".  Very easy to read and understand; we're 1/2 way through it now.

Later, I'm sure I heard him say "Yay, Mum's going to help me more with my maths this week!" in his put-on 'cutsie' voice.  I realised then that he must be finding the NSM Singapore maths challenging, so we spent lots of time together going through that.  He's covering Fibonacci sequences, so I'm sourcing some more living maths books for him.  It was a good reminder that (i) he needs to let me know when he's struggling, and (ii) I need to clue in more to his needs / read his textbook ahead, so he doesn't feel lost.


5. Both of the children have been working fabulously together using the ACID digital music program.  My husband found he had a sample program already, so it's been downloaded to the family computer and both children enjoy working at compiling their own masterpieces.

Saturday, August 13, 2011

Treasured Moments (1)

Do you find yourself falling into a pattern of daily grind, skipping the 'fun' activities because you don't have time or lack energy?

Do creative arts, nature walks, drama, read alouds or spontaneous acts seem only a distant dream in your life?

Yet these Treasured Moments shared with loved ones uplift us, nurture our soul, remind us of the beauty and joy in our lives.

We want Treasured Moments for ourselves, for our children, for our families but how can we make it happen?

... Commitment ... Encouragement ... Support ... Ideas ... Plans.

You are invited to join us at the end of every week and share your plans and ideas, your targets and goals and your stories ... your 'Treasured Moments'. In this way we may inspire one another, encourage ourselves and start achieving our dreams. Hosted by Erin at Seven Little Australians and Counting

My Treasured Moments this week are:  

1. Taking time with the children to enjoy our trip to the city for an appointment, and having lunch together rather than just rushing back home.  

2. Working together in the garden, planning our new space for a greenhouse and potting up more herbs. We all got involved, and I was so happy to see the children get excited about some new projects.


3. Both children are getting more creative with their cooking, so I'm having to relax and let that happen so they can learn. Timeframes for mealtimes need to be a little more lenient until the methods are well established. There are just so many lessons to learn when preparing food.  So, many treasured moments in the kitchen, and in the eating afterwards!

4. Mariposa worked on a lovely pastel picture, as well as a cake from a new recipe, to give to her horseriding teacher. The joy she had in presenting this was so lovely.  

5. We took another impromptu moment yesterday to catch up with friends for a cuppa. Four mums and ten children had an absolute ball relaxing for afternoon tea and a chat (well, and a few other boisterous games with the children!)

To join in you are welcome to add your post on Seven Little Australians and Counting using the Mr. Linky form (please link to the individual post) and include a link back to Erins post. If you haven't a blog we would still love to hear your voice, just leave your stories in the comments

Monday, July 25, 2011

A weekend treat: Pecan Pudding

Does anybody else do the once-a-month deal of eating from whatever's already on-hand in the kitchen for a week?

This is something I started doing quite a while back, and it's become a little tradition. Mind you, it's not easy when the staples like flour, potatoes and rice start disappearing. By this weekend just gone, I had to go to my store cupboard and pull out another 25kg sack of wheat grain out to put into the pantry. The last of the brown rice went Thursday night, and we still have a couple kg of potatoes in the basket.

Our Sunday menu looked very interesting, but we certainly didn't starve at all.

Breakfast:
Museli with tinned pears.

Lunch:
Potato wedges (tossed in a mix of plain flour and garlic powder, then placed on baking tray with a drizzle of oil, into a hot oven on the top shelf). I had a little cream cheese left, so I warmed that to have with some sweet chilli sauce (if anyone wanted).
Apples.

Dinner:
Creamy vegetable and lentil soup. This was simply a sauteed mix of 1/2 a brown onion, 5 celery stalks, 2 large carrots and a small head of broccoli. Add 1 cup of red lentils, enough water to cover liberally, and some chicken stock cubes. Cook until tender and then puree.

Earlier in the day, I'd found a small packet of pecans hiding away. Aha! Pecan pudding. This is so yummy, and makes enough for 8.


Pecan Pudding:

1/3 cup brown sugar
1 1/4 cups self-raising flour
1/2 cup milk
1 egg, lightly beaten
80g butter, melted
75g pecan nuts, chopped

Into mixing bowl, sift flour and brown sugar together.  Add pecans and toss through to coat.
In a separate bowl mix the milk, melted butter, and beaten egg.  Add to dry ingredients and mix until smooth.
Spoon into greased oven proof dish (1 litre capacity).

Sauce:
1/2 cup brown sugar
1 tbsp cornflour
1/4 cup golden syrup
1 1/4 cups boiling water

Mix brown sugar with the cornflour until smooth, then sprinkle over the pudding base.
In a small jug, add the golden syrup to boiling water until well mixed, then carefully pour over brown sugar and cornflour mixture.

Bake in a 170degC oven for 50 minutes, or until topping is golden.  Remove from oven and let stand 5 minutes until serving.

We found a little vanilla ice cream to go with ours, and it was very YUMMY!

Sunday, May 15, 2011

Savings workshop

Several months have passed since I was first told about the Saver Plus program offered via the ANZ bank (Australia). Well, I FINALLY got in touch with them and have now been signed up for a month.

The program is actually run by the Brotherhood of St Lawrence, and involves a couple of 2 hours sessions on money management. A small group of us got together to discuss general budgeting ideas and share ideas or products that may not have been previously known. We had some fun, and shared lots of interesting pointers. I think the best I came away with was that reading up on Money magazine c/- of the library is worth some time. There are plenty of recent updates about new savings plans with banks, the best phone deals, etc.

We had fun deciding on 'NEEDS' vs 'WANTS'. As everyone's family situation is different, how we categorised differed to some extent. I also learnt that my 'savings personality' was more the 'Penny Pinching' kind. I guess that's something you learn, as I know my mother was like that, and I have other siblings who are very similar.

Thankfully, though, I was able to share one tip that was seen as very helpful. It something I've shared before, and know that many other bloggers do also. It's all about knowing what's in your pantry and fridge/freezer, then menu planning so as to control the spending in the supermarket.

Once a month we try to have a minimum spending week. I go through the pantry and fridge/freezer and list what we DO have in stock. Then I try to create a menu to fit around those food items, making everything stretch as much as possible so as to avoid another shop that week. It always surprises me what I'd forgotten about, like a few pieces of puff pastry in the freezer, or a can of mixed beans and a packet of sago in the pantry.

I also had a nice big piece of beef rump I'd bought at an excellent price. I cut into some smaller pieces: 8 medium sized 'steaks', a decent amount for a beef & mushroom stirfry, and the remaining piece for a hearty beef & barely casserole.


MMMmmm! That casserole was good. So good that the children asked if I could make it again sometime (which I will). Here's how I cooked it:

A small piece of beef rump (around 300g).
Put into a stock pot (or crockpot) and pour over boiled water from the kettle (this sears it, minimising scum and avoiding having to seal the meat with oil).
Add a collection of diced vegetables (not the potatoes yet), 3 tablespoons of tomato paste, a beef bullion and 1 cup of pearl barley. Make sure all is well covered with enough water.
Leave it to slowly cook away on a low heat (or crockpot set on 'high').
Check meat after several hours to check tenderness. I then removed it and diced it up, but you could just shred it if desired.
Add in 2 diced potatoes. When potatoes are cooked, serve.

I served these with some pastry pieces.
2 pieces of puff pastry. Sprinkle one piece with some grated cheese. Place 2nd piece of pastry over the top. Cut into equal portions.
Lay on baking tray and sprinkle with sesame seeds, then bake for 20mins, or until golden brown.


Getting back to the Saver Plus program, check the ANZ site HERE to see if you qualify. The current program was going to be ending some time soon. I am not sure of another launch date at this stage, but enquiries will probably inform you of any updates.

Sunday, April 10, 2011

Ironing lesson #1

It was decided by Mariposa that today would be a good day to learn to use the iron.

I admit, I'm not the most organised housekeeper, and our ironing is usually done as needed. Otherwise, clothing items are folded and put into drawers until required. So, I haven't exactly been the best role-model for my daughter.


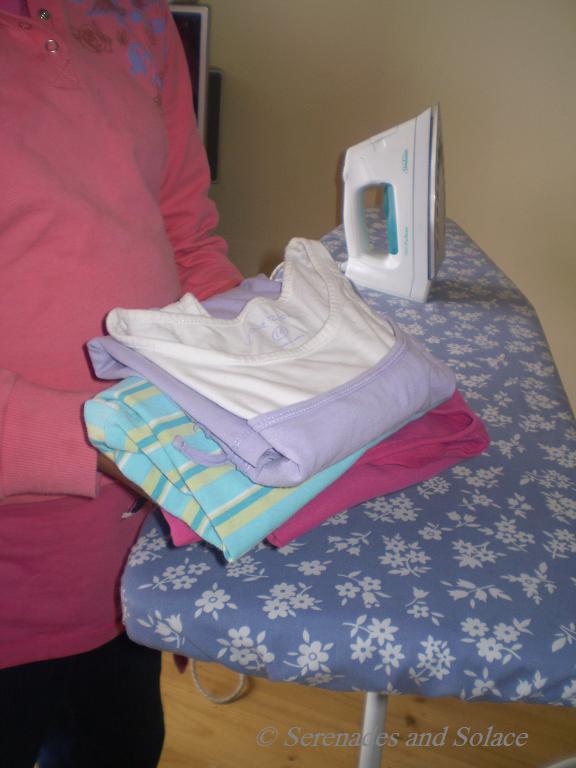
We'd already ironed our shirts, pants and skirts to wear yesterday, when Mariposa asked if she could practice ironing her clothes.

Some of her items are fiddly, or made of material that needs caution. I suggested she start with something simple. Handkerchiefs would surely be the easiest thing to begin with.


Check the water level, then the iron settings. Safety rules were explained about NOT touching the plate and keeping the iron moving across the fabric. Then starting slowly, iron the handkerchief flat. Set the iron aside, then go about the folding.


Five handkerchiefs later, Mariposa produced three of her cotton tops she wanted to try to iron. She did a great job!