Showing posts with label recipes. Show all posts

Sunday, March 8, 2015

Spiced blood plum jam


My singing teacher has been inspiring me to get into the kitchen.  The last couple of weeks have started with at least 10 minutes talking about our latest cooking experiments, hers involving chutneys and jams.  She graciously shared a jar of her Nelly Melba jam (peach and raspberry), so it's only fair that I return her jar refilled with something from my garden and kitchen.


I thought I'd try altering my basic plum jam recipe, using the blood plums from our tree, but adding some of our apples and spices.  Here's what I did:

600g blood plums, cleaned, stoned and chopped
400g apples (I used 3 granny smith and a golden delicious), peeled, cored and chopped
800g white sugar
1 teaspoon ground ginger
2 teaspoons ground cardamon
juice of one orange

Prepare jars and lids by sterilising in boiling water in large saucepan, then transfer to warm oven to dry and stay warm.

Slowly warm the fruit in a large saucepan with the sugar, stirring with wooden spoon until sugar is dissolved.
Add spices and orange juice.  Stir gently and allow to come to boil.  Check for setting point by dropping a spoonful onto a cool plate. When jam is cool, you should be able to draw your finger through the jam without it being too liquid .. the line your finger made should remain.  When setting point is reached, bottle into warm jam jars with a small ladle, then seal with lid immediately.

I printed off some labels from Pinterest, found HERE.

I'm quite happy with the flavour of this 'experiment', and it has a really nice consistency also.

Friday, December 7, 2012

Cherry season!

It's early Summer and it's CHERRY SEASON!  Yum!  This is our first fruit crop of the season.  Our Stella Cherry tree produced a 'stella' crop.  Look at this huge bowlful, and that's only about 1/4 of what we picked.


Unfortunately, not all the fruit ripened fully on the tree.  We had to pick it early as the birds were having a huge feast.  I don't mind them having some, but it was disappearing very quickly.  Picking the fruit early means that they don't develop their natural sweetness to the maximum, because cherries won't continue to ripen after being picked, unlike other stone fruits. (I learnt that from the River Cottage dvds).

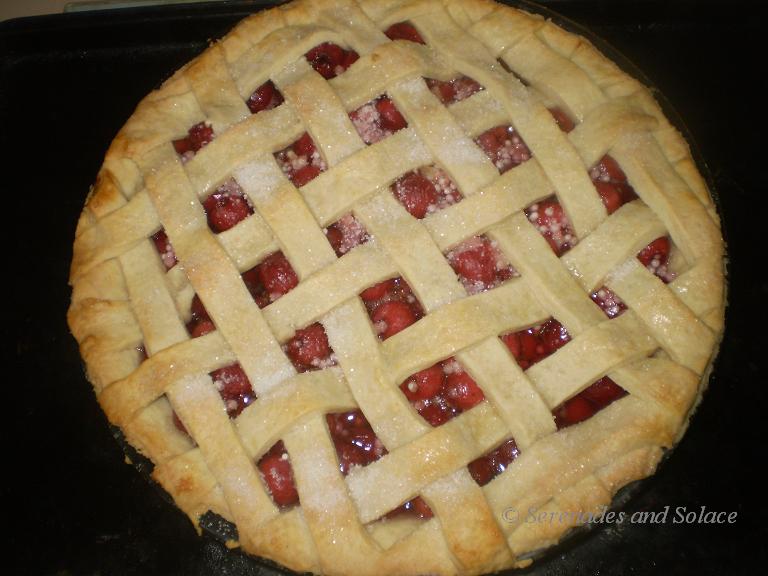
Last night we decided to have a go at making a cherry pie.  It gave me a chance to try out this little gadget: a cherry stoner.


My hands were very sticky and very well stained after we finished doing four cups worth!

We followed a recipe I found at Joy of Baking.  It uses tapioca as a thickening agent, which I had on hand, so thought we'd try out.


After the required baking time, I found I needed to let the pie 'sit' a little while to cool and let the tapioca soak up all the lovely cherry juice.  Maybe it's because my tapioca wasn't the 'quick cooking' variety specified.  Anyway, it tasted WONDERFUL!


Until next post!

Catherine

Sunday, November 25, 2012

Yummy garlicy potato wedges

These are just SOOOoooo yummy, and so easy to make.  
Mariposa quickly put this together for us for lunch this weekend.


Prepare a large baking tray by lining with baking paper.
Set oven to 200degC.

Allow two medium sized potatoes per person.
Cut into wedges and pop into a bowl.


Sprinkle over a tablespoon of plain flour 
and 1/2 a teaspoon of garlic powder*.
Toss to coat wedges well.

(*Add a teaspoon of minced garlic if you don't have 
garlic powder, as we did this time.)


Place wedges onto a baking tray, in a single layer.
Drizzle over some olive oil.

Bake for 30 mins.
Turn pieces over for even browning and cook another 30 mins.

Eat whilst hot, sprinkled with some salt, 
and a dollop of sour cream and sweet chilli sauce if so inclined.

Enjoy!!


Friday, September 28, 2012

Salmon Quiche

Another dish has made it to the 'Our Favourites' list.  I made a salmon quiche for lunch last weekend.  It's been a nice way to get through some of the eggs.  Already Maestro is asking when we can have it again, so I decided to cook it up for lunch tomorrow.  Once fully cooked, it can be reheated and served with a salad and some crusty bread.


Salmon Quiche

Pastry:
1 1/4 cups plain flour
90g chopped butter
2-3 tablespoons iced water

1.  Brush a pie dish, or flan tin, with melted butter or oil.

Sift flour into a large bowl; add in chopped butter. Using fingertips, rub butter into flour until crumbly.
(Alternatively, put into food processor and pulse until it resembles breadcrumbs).

Add some of the water and work until the dough begins to come together.  Add more water if needed.
Turn onto floured board and work into a ball so all comes together.  Roll out pastry so it's large enough to cover base and sides of tin.  Fit into dish/tin and then refrigerate for 20mins (minimum).

2. Preheat oven to 180degC.

Cover the pastry with baking paper and a layer of dried beans or rice.  Bake for 10 minutes, remove from oven and discard paper and beans/rice.  Return pastry to oven and cook another 10 minutes until lightly golden.  Cool.

Filling:
420g tin salmon (red or pink)
1/2 cup soft cream cheese
1/3 cup ricotta cheese
3 eggs, lightly beaten
3 spring onions, finely chopped
1 tsp dill (optional)

3. Drain salmon well and break up in a large bowl.

Place cream cheese, ricotta and eggs into a food processor and pulse until mixture is smooth.

4. Stir egg mixture into salmon, adding spring onions and dill.

Pour into prepared pastry shell.  Bake 30-35 minutes until golden and set.


Hope you enjoy it! :)


Wednesday, June 27, 2012

Quince results

Well, I have some good news and some bad news.

The good news is that the quince has cooked up beautifully and tastes wonderful. ( ** I added the juice of 1 lemon after a taste test a couple of hours after cooking. It needed some sourness added as it was too sweet.) We tried it out after 8hrs of cooking in the crockpot and found it was a lovely ruby red, but more like jam than the thick texture to put into molds for 'cheese' (or quince paste, as it's sometimes called).  So, some of it was taken out and put into some jars before turning the crockpot back on the try and get a thicker consistency.

The bad news is that the remaining quince jam still didn't get thick enough.  In fact, I had to turn it off as I was getting very concerned that it would develop a burnt taste.  I've ended up with a thicker version of the jam with a stronger flavour, which is still edible; I just didn't get to the really thick stage.

Here you can clearly see the difference:

On the left, the thinner 'jam',
and the thicker result on the right 
... which the children have already been
enjoying with cheese & crackers!

Maybe next time I'll just try making this in a regular stove-top saucepan.  An open saucepan and a higher constant temperature may remove more of the moisture, giving me a thicker consistency.

*   *   *   *   *

Whilst I was experimenting with this interesting fruit, Mariposa was working on her science experiment.  She has been learning about the digestive system, using Sonlight Science 5.


Here Mariposa has been seeing the effect of detergent (the emulsifier) on oil and water.  It was set up to show how bile breaks up fat molecules as food passes into the small intestine.

Of course .. who can resist the urge to make bubbles afterwards!


Thank you for dropping by!

Monday, June 25, 2012

Quince cheese

I'm trying something new .. which always makes me a bit nervous! .. but I thought I'd share this as part of participating in a meme: "Making Your Home Sing: Monday" at momstheword.

Quince cheese is something my South American mother-in-law introduced me to some time back.  It's very popular with cheese and crackers.  So, when I was given some quinces from a friend, I decided to have a go at making this up.

They're tough pieces of fruit; a little furry on the outside, but more like very firm apples.  We tried a little sliver raw ... very tart!  I don't think one would like to eat these without some kind of sweetening.


I chopped them all up roughly and popped them into a saucepan with a little water.  Then they were cooked slowly to soften (about 30mins).

Once they were soft enough, I put them through the mouli.  I had 8 quince to begin with, so about 1kg of sugar was added and stirred until dissolved.

This is what I've ended up with.  It's now going into the crockpot to slowly cook for several hours.  Apparently it will turn a deep ruby red and thicken.


Well ... it's been cooking since this morning and it's smelling lovely!  I'll let you know if it was a success or not soon.

Do you have something to share that helping make your home sing?  Jump on over to momstheword and join in.  Her post up today is very worth reading, too!


Thank you for dropping by!

Wednesday, May 30, 2012

Macadamia 'Blondies'

This recipe is for my friend, whom we visited yesterday afternoon.  It was given to me a while ago by another friend.

I took along a batch of these brownies, which turned out to be more like 'blondies' when I had changed the dark chocolate for milk chocolate.  I guess you could also try using white chocolate as a substitute.


Yes, they're squishy in the middle and terribly 'moreish'.  I warn you, a plate of these can disappear VERY quickly!

185g butter
185g dark chocolate (or milk, as I've done here) ... and GOOD QUALITY is a must or it's all too wet.
3 large eggs
250g caster sugar
1 tbsp vanilla
115g plain flour
pinch of salt
1/4 cup macadamias (or choc bits, other nuts)

Melt the butter and chocolate gently in a double boiler, then set aside to cool.
Beat eggs and vanilla, gradually adding sugar until light and frothy.
Gently stir in cooled chocolate mixture, then fold in sifted flour and salt.
Pour into a lined lamington tray, and cook at 180degC for 20-25mins.  It'll form a meringue like crust on the top and stay soft in the middle.

Thank you for dropping by!


Monday, March 19, 2012

Afternoon tea on Sunday

I finished my first ever tea cozy!  It didn't take very long to make, and I've realised I could make several more as the amount of wool used was minimal.  What's more, it was fun!


I had found this book at the library, Tea Cozies 2 by the Guild of Master Craftsman.  There is quite a collection of fun little numbers there; some are simple, others very ornate.  I decided my first would be a simple looking one: Strawberries and Cream.

My well loved little teapot doesn't look too bad with it's new 'jumper'.


Now, having completed this new tea cozy, we have to put it to use.  So, I quickly whipped up a yummy banana cake for us all to enjoy for afternoon tea.  It's a new recipe, from the Country Women's Association's new cookbook: Classics.  This cake was so lovely and moist.  The cream cheese frosting topped it off beautifully.


I guess you could say that I've just given both the pattern and recipe a trial run.  I have a tea cozy made for a girlfriend I'm visiting today, and I'll whip up another banana cake to take with me.


Thank you for dropping by!

Friday, December 9, 2011

Mango Ice Cream

Mariposa's been creative again.  It's just how she is; she always has to be doing something and that something's been in the kitchen more often than not lately. It's also a great way to make sure she's getting some reading done (and maths!)

Last month we purchased a couple of boxes of mangoes.  The first box disappeared promptly as my children morphed into fruit bats.  Then, as the novelty began to wear off, we were left with those that were ripening quickly.  This is where Mariposa came and stepped in to the rescue, as she got to work cutting out all the fruit and laying it on trays in the freezer.

Frozen mango pieces are great for a refreshing smoothie, but 2 cups worth were transformed into a delicious ice cream that I would really recommend you try.  This recipe comes from a book "Homemade Icecream Naturally", isbn 1-86256-075-7.


Mango Ice Cream:
(makes 1 litre)

4 large, ripe mangoes (or 3x 425g cans mango segments)
150g caster sugar
1 egg
465ml cream
65 ml (1/4 cup) milk
1 tsp vanilla essence

1.  Peel, seed and sieve the mangoes to remove fibres.

2.  Place mango puree and 75g of the sugar in a double boiler and simmer gently for 15 minutes.  Cool and chill the mango mixture for 30 minutes before using.

3. Place the egg, remaining sugar, 65ml (1/4 cup) cream, milk and vanilla essence in the blender and process for 30 seconds.

4. Add the chilled mango puree and blend for 15 seconds.  Continue blending for about 30 seconds while adding the remaining 400ml cream.

5.  Place the mixture into an ice cream maker and freeze (or, do as we did and place in a metal baking tin.  Using a fork, stir through every 20-30 minutes to disperse ice crystals. Continue until firm.)


Mariposa served this cut into wedges, but it could easily be whipped up again with a fork, after sitting a few minutes out of the freezer, then served with an icecream scoop.


This recipe is just delicious!


Monday, July 25, 2011

A weekend treat: Pecan Pudding

Does anybody else do the once-a-month deal of eating from whatever's already on-hand in the kitchen for a week?

This is something I started doing quite a while back, and it's become a little tradition. Mind you, it's not easy when the staples like flour, potatoes and rice start disappearing. By this weekend just gone, I had to go to my store cupboard and pull out another 25kg sack of wheat grain out to put into the pantry. The last of the brown rice went Thursday night, and we still have a couple kg of potatoes in the basket.

Our Sunday menu looked very interesting, but we certainly didn't starve at all.

Breakfast:
Museli with tinned pears.

Lunch:
Potato wedges (tossed in a mix of plain flour and garlic powder, then placed on baking tray with a drizzle of oil, into a hot oven on the top shelf). I had a little cream cheese left, so I warmed that to have with some sweet chilli sauce (if anyone wanted).
Apples.

Dinner:
Creamy vegetable and lentil soup. This was simply a sauteed mix of 1/2 a brown onion, 5 celery stalks, 2 large carrots and a small head of broccoli. Add 1 cup of red lentils, enough water to cover liberally, and some chicken stock cubes. Cook until tender and then puree.

Earlier in the day, I'd found a small packet of pecans hiding away. Aha! Pecan pudding. This is so yummy, and makes enough for 8.


Pecan Pudding:

1/3 cup brown sugar
1 1/4 cups self-raising flour
1/2 cup milk
1 egg, lightly beaten
80g butter, melted
75g pecan nuts, chopped

Into mixing bowl, sift flour and brown sugar together.  Add pecans and toss through to coat.
In a separate bowl mix the milk, melted butter, and beaten egg.  Add to dry ingredients and mix until smooth.
Spoon into greased oven proof dish (1 litre capacity).

Sauce:
1/2 cup brown sugar
1 tbsp cornflour
1/4 cup golden syrup
1 1/4 cups boiling water

Mix brown sugar with the cornflour until smooth, then sprinkle over the pudding base.
In a small jug, add the golden syrup to boiling water until well mixed, then carefully pour over brown sugar and cornflour mixture.

Bake in a 170degC oven for 50 minutes, or until topping is golden.  Remove from oven and let stand 5 minutes until serving.

We found a little vanilla ice cream to go with ours, and it was very YUMMY!

Sunday, May 15, 2011

Savings workshop

Several months have passed since I was first told about the Saver Plus program offered via the ANZ bank (Australia). Well, I FINALLY got in touch with them and have now been signed up for a month.

The program is actually run by the Brotherhood of St Lawrence, and involves a couple of 2 hours sessions on money management. A small group of us got together to discuss general budgeting ideas and share ideas or products that may not have been previously known. We had some fun, and shared lots of interesting pointers. I think the best I came away with was that reading up on Money magazine c/- of the library is worth some time. There are plenty of recent updates about new savings plans with banks, the best phone deals, etc.

We had fun deciding on 'NEEDS' vs 'WANTS'. As everyone's family situation is different, how we categorised differed to some extent. I also learnt that my 'savings personality' was more the 'Penny Pinching' kind. I guess that's something you learn, as I know my mother was like that, and I have other siblings who are very similar.

Thankfully, though, I was able to share one tip that was seen as very helpful. It something I've shared before, and know that many other bloggers do also. It's all about knowing what's in your pantry and fridge/freezer, then menu planning so as to control the spending in the supermarket.

Once a month we try to have a minimum spending week. I go through the pantry and fridge/freezer and list what we DO have in stock. Then I try to create a menu to fit around those food items, making everything stretch as much as possible so as to avoid another shop that week. It always surprises me what I'd forgotten about, like a few pieces of puff pastry in the freezer, or a can of mixed beans and a packet of sago in the pantry.

I also had a nice big piece of beef rump I'd bought at an excellent price. I cut into some smaller pieces: 8 medium sized 'steaks', a decent amount for a beef & mushroom stirfry, and the remaining piece for a hearty beef & barely casserole.


MMMmmm! That casserole was good. So good that the children asked if I could make it again sometime (which I will). Here's how I cooked it:

A small piece of beef rump (around 300g).
Put into a stock pot (or crockpot) and pour over boiled water from the kettle (this sears it, minimising scum and avoiding having to seal the meat with oil).
Add a collection of diced vegetables (not the potatoes yet), 3 tablespoons of tomato paste, a beef bullion and 1 cup of pearl barley. Make sure all is well covered with enough water.
Leave it to slowly cook away on a low heat (or crockpot set on 'high').
Check meat after several hours to check tenderness. I then removed it and diced it up, but you could just shred it if desired.
Add in 2 diced potatoes. When potatoes are cooked, serve.

I served these with some pastry pieces.
2 pieces of puff pastry. Sprinkle one piece with some grated cheese. Place 2nd piece of pastry over the top. Cut into equal portions.
Lay on baking tray and sprinkle with sesame seeds, then bake for 20mins, or until golden brown.


Getting back to the Saver Plus program, check the ANZ site HERE to see if you qualify. The current program was going to be ending some time soon. I am not sure of another launch date at this stage, but enquiries will probably inform you of any updates.

Tuesday, March 29, 2011

Green pea soup

We tried something new for lunch today, and it only took around 15 minutes to prepare: green pea soup.


Take 1/2 cup of frozen green peas and 1 cup of chicken stock (per person).
Cook through, then blitz quickly with the blender. Season to taste and serve in a mug. This was sweet, smooth deliciousness.

Sunday, March 20, 2011

Girls in the kitchen

How do you like your muffins?  
There are a lot of choices, but plain muffins with choc chips are very nice!


Everything is carefully measured out before starting any mixing.


You pour while I keep stirring.


Okay, this is messy, but I like that we can lick the spoon afterwards.


Here's the recipe the girls made, all on their own, today:

Choc Chip Muffins

2 1/2 cups SR flour
1/4 cup caster sugar
1/2 cup choc chips
2 eggs, lightly beaten
1 1/2 cups milk
160g melted butter

In a large bowl, mix the flour, sugar and choc chips.
Mix the wet ingredients together in a separate bowl.
Add the wet ingredients to the dry, and gently fold together.
Spoon into muffin tray (makes 12 muffins).
Bake at 180degC for 20-25mins.


Sunday, February 27, 2011

Apple harvest : cider and jelly

We always lose some apples to the birds, but we did pretty well with this year's harvest. Maestro and I got to work plucking the apples on Friday. Two and half laundry baskets have been brought in, and my job today is to sort out those for longer storage from those that will need cooking up. Several apples from the lower branches have some kind of spotting on them, but it's only on the skin; everything inside is quite sound. It just means that these will need cooking up.


After cleaning several apples, they've gone through my trusty juicer. Fresh apple juice is so refreshing, and we'll probably indulge in this for a few days. I'm having a go at fermenting 2 litres, though, to make some apple cider.


 I'd been told about Oztops a few months ago. We've been having a go making our own Lambrusco with grape juice, and apple cider using bottled juice from the supermarket. It's a very simple process, only taking 2 days before a brew is ready to drink. Let's hope the home juiced apple cider tastes just as lovely.


Using Oztops is so easy. Just add in a little yeast to your juice, then change the lid.  The lid has a small valve that allows excessive gas to escape, so no bursting bottles!


On Wednesday, I decided to take Mariposa berry foraging where it's known that blackberries haven't been sprayed. We came away with almost a kilogram of berries! Yum!! Some were eaten that night with icecream. The remainder was then divided. Half have been frozen, but the other half are now going to be turned into apple and blackberry jelly.


Here's what I've done so far:

Wash and prepare 450g berries, and 8-10 apples to be diced (core and skin still on .. just clean off any blemishes). Thinly peel rind from 2 oranges, then juice oranges. Orange juice and rind is to be added to berries and apples in large saucepan. Add 3 cups of water. Slowly bring to boil and let simmer until fruit is very soft (about 40mins).


Strain off all the liquid using muslin, or as I've done in an old linen teatowel. Don't squeeze the juice out or it will become cloudy.  Measure liquid. Add 3/4 cups of sugar to 1 cup liquid, and boil in saucepan as one would when making jam or jelly.  When at setting stage, carefully pour into sterilised jars.

I'm up to this final stage tonight. After straining the liquid off for almost 3 hours, I can see there's a decent quantity and the most beautiful deep rose colour.  Well, I'd better get to it and finish the job!  I won't have time to do this tomorrow.